Newsletters in ViArt have undergone significant changes and now called Email Campaigns. The main feature of new module is the ability to create a series of timed email campaigns targeted to a group of customers. Create all your emails in advance, combine them in groups (campaigns) and simply activate the campaign - system will send out each unique email on its timed sequence. Another fundamental change is ability to run reports on a campaign. Doing so will allow you to know out of the targeted set of emails, who purchased, when and who didn't purchase.
- 1. Create a campaign.
Go to Dashboard > Email Campaigns and click Add New. Give a name to your new campaign, activate it and select Start and End dates.
Start Date is required and it tells the system when newsletters should start to send out. For example, you may prepare a Christmas newsletter and set it to send out on 25th of December. By default 'Start Date' has a today date. You can change it using the time format advised in the brackets e.g. (use following format M/D/YY H:mm).
End Date is optional and unless you want to stop sending this campaign's newsletters on certain date leave it empty.

- 2. Create newsletters.
Once campaign is created click on Newsletters link.

Now you need to fill the campaign with newsletters you would like to send out. It could be one newsletter or it could be a series of newsletters. For example, if you send a Christmas newsletter probably you need one newsletter with best wishes congratulations but if you send an Abandoned Orders notification you may wish to send a few emails, e.g. the first email could be sent on the next day after attempted purchase and second - in 7 days offering a discount.
To create a newsletter click Add New link.

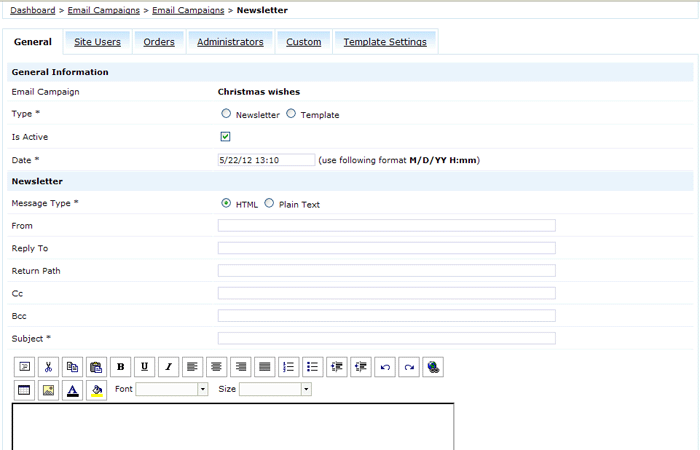
General tab has the most important settings - the type of email (newsletter or template) and the email body.

- Type - it's a new setting to determine whether it is a usual newsletter or a template for creating usual newsletters based on the criteria in Template Settings tab. If it's a usual newsletter that you need to send once select "Newsletter" type but if it is an email you wish to send repeatedly, for example for all customers with abandoned orders or for all customers who bought products for over $1000 etc. select "Template" type. By default if you don't select any type system considers an email a "Newsletter".
- Date - it is the date when newsletter should be sent. For example if you use cron, script will not send this newsletter earlier this date and if this newsletter is template it would be the date of the first newsletter in the series.
- Email body - specify all standard email fields and note a few peculiarities:
- you can select HTML or Plain Text Message Type and in case you select HTML we recommend to select WYSIWYG or CKeditor in Settings > System > Global Settings > Text Editor;
- in Body Source you can find this line:
‹p> ‹img border="0" height="1" src="http://www.site.com/email_open.php?eid={eid}" width="1" /> ‹/p>
This line is added by default (even if you delete it) and used to track email statistics for Opened column. Please keep in mind if you wish to gather stats for other columns like Clicked, Orders (#), Orders ($) you should add a special parameter to the URL &eid={eid}.
- below Email Body there is a checkbox "add unsubscribe link" select it if you wish to add an automatic unsubscribe link to email body, clicking on it in the email user will be unsubscribed from receiving additional emails from this campaign and future newsletters.
- in Email Body you can use the tags: {name} {email} {first_name} {last_name} and if you send order notification {order_items}.
In Users tab are settings to select the targeted user type(s) or users who subscribed to receive newsletters. It's possible to create a custom list of subscribers and import it via Custom tab. In Administrators tab select an admin group(s) to receive this newsletter.
Orders tab is an innovation starting from version 4.1. With the help of this tab you can select targeted customer group based on their orders history. For example, select customers with certain Order Status (New Order, Shipped, Refunded etc.), customers who purchased within specified Time Period, customers who shipped items to Country or State of your choice, customers who spent over $1000 per order (Order Total) or maybe customers who used some special Coupon Code. An additional feature on Orders tab is that you can assign a new status to order once customer receives a newsletter - for this just select Update Order Status option.
Important! Orders and Users settings in corresponding tabs work independently from each other which means if you select 'Customer' user group in Users tab and 'Paid' status in Orders tab emails will be sent both to all users with 'Customer' type (regardless of their orders history) and to all customers with 'Paid' orders (regardless of their user type). That's why please be attentive and use only one of these tabs.
Note, Orders tab settings From Date and To Date are used with Template Settings option Filter Interval. More about it below.
- 3. Template Settings tab.
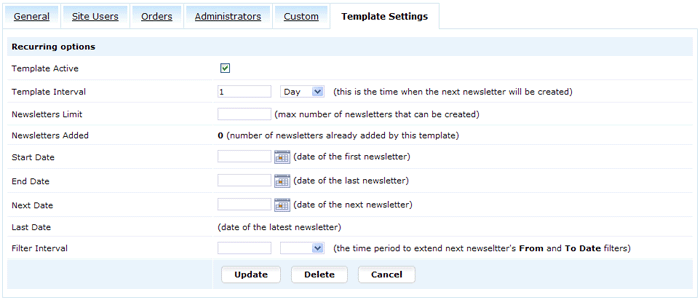
To use this tab please make sure you to select email Type (o) Template in General tab (otherwise Template Settings wouldn't work). To understand the difference between 'Newsletter' and 'Template' imagine a usual product and a recurring product. You buy a usual product and that's it, no more action, but the recurring product sets a cycle of payments. The parent recurring order (in our case template) sets the settings for future orders (newsletters). Then you can either click a link in admin to manually generate recurring orders ('Generate Template Newsletters') or set this link on cron.
So in Template Settings tab you can select when and how future newsletters should be generated:

- Template Interval - determines how often newsletters should be generated. Usually this setting needs to be set to 1 Day.
- Newsletters Limit - it shows you that after a 3d newsletter for example, the template becomes inactive, it does not apply to newsletter subscribers but the generated newsletters.
- Newsletters Added - it's a static message that shows how many newsletters were generated.
- Start Date - the date of the first newsletter. Set only if you want to start sending newsletters from a certain date e.g. Christmas Eve.
- End Date - the date of the last newsletter.
- Next Date - the date when the next newsletter will be generated. This field updates automatically.
- Last Date - shows the date of previous newsletter.
- Filter Interval - this important setting allows to shift orders filter for every next newsletter. For example how to pick up abandoned orders every day and make system send two emails: on the next day after attempted purchase and in 7 days offering a discount? Only with the help of this setting where you point out an interval value which is applied to the 'From Date and End Date' in the Orders tab.
- 4. Example: Abandoned Orders Newsletter Campaign
Let's create a perpetual email campaign that will send an email reminder to abandoned cart customers. The perpetual email campaign is made up of three unique reminder emails. Let's say that the campaign starts on May 22, 2012. The campaign sends out email #1 to all New Order Placed orders in the ViArt database. After four days, the campaign will send out email #2 to the original set of New Order Placed customers minus those who completed their order as a result of the email #1 reminder. Then 10 days later email #3 goes out to the same set of original email targets minus those from email #2 who completed their order. The perpetual email campaign is constantly adding and subtracting new users and sending them reminder emails.
We will need three templates to set the tone for the whole campaign:

1) Abandoned Cart email (1 day) should have such settings:
Orders Tab > Status: "New Order Placed"
Orders Tab > From Date: May 21, 2012
Orders Tab > To Date: May 21, 2012
Template Settings Tab > Template Interval: 1 day (means newsletter will be generated every day)
Template Settings Tab > Filter Interval: 1 day (will shift From Date and To Date on 1 day with each newsletter, for example tomorrow newsletter will aim orders with date filter: May 22, 2012 - May, 22 2011, the day after tomorrow May 23, 2012 - May 23, 2012 and so on.)
2) Abandoned Cart email (4 days) should have such settings:
Orders Tab > Status: "New Order Placed"
Orders Tab > From Date: May 18, 2012
Orders Tab > To Date: May 18, 2012
Template Settings Tab > Template Interval: 1 day
Template Settings Tab > Filter Interval: 1 day
3) Abandoned Cart email (10 days) should have such settings:
Orders Tab > Status: "New Order Placed"
Orders Tab > From Date: May 12, 2012
Orders Tab > To Date: May 12, 2012
Template Settings Tab > Template Interval: 1 day
Template Settings Tab > Filter Interval: 1 day
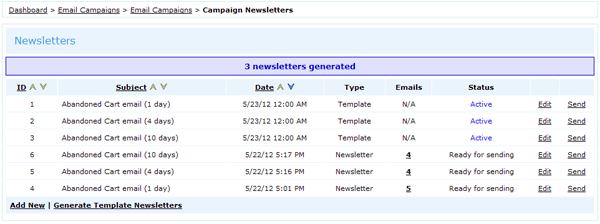
After templates are configured return to newsletters list and click on Generate Template Newsletters, you should see the following screen:

Under column Date you can see when newsletter was created.
Under column Type you can see if it is a newsletter or template.
Under column Emails is the total count of all email receivers. If you click on the emails number you will see a list with all email addresses which you can edit, delete or add new addresses.
As usual you may preview the newsletter and select newsletter cycle settings if you click on Send button.

The final step is to click the button Start Sending Newsletters. Once sending process is finished on Dashboard > Email Campaigns > Email Campaigns > Stats page you may check how many emails were actually sent, how many bounced, how many were opened, how many users have unsubscribed and most importantly if customer bought anything after receiving email.

- 5. Cron
Generation and sending of newsletters is recommended to set on cron. How to do it: go to your hosting cpanel and find Cron section or contact your hosting administrator to help you enable a cron command like this:
0 6 * * * /path/to/php -f /home/viart/public_html/admin/admin_newsletters_send.php -l mylogin -p mypassword
Pay attention that admin scripts must be run by authorized user so do not forget to specify administrator login and password in the cronjob.
Note: The script 'admin_newsletters_send.php' both sends emails and triggers generating newsletters so you need only one cron.


