A new version 4.1 is released
Dear Customers,
We are happy to announce version 4.1. It contains many new exciting features such as Mobile Version, Multi-Shipping, Email Campaigns, CKEditor and many many more.
Download ViArt Shop v.4.1 now!Multi-Shipping
New multi-shipping logic allows to ship items from different locations. It's useful when you have many warehouses, for example in Europe and in USA, and you wish to restrict shipping or apply different rates for some products based on their location.

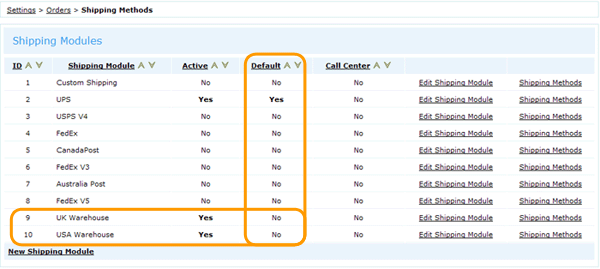
Settings: In Settings > Orders > Shipping Methods create several shipping modules, for example 'UK Warehouse' and 'USA Warehouse' and add appropriate set of methods in each module (remember: the shipping module should have methods for all countries)
Next go to Dashboard > Products > Products & Categories > Edit Product > 'Stock & Shipping' tab and select Shipping Module(s) that should apply for this product.
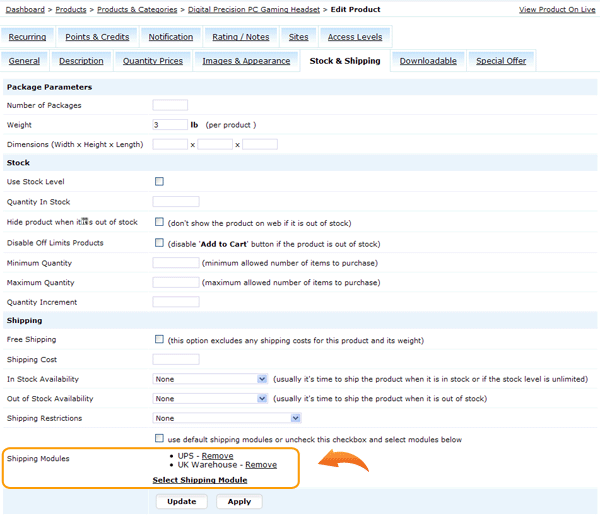
Note: If you don't select any module for product, then it will use shipping module marked as "Default". For example, on screenshot below default shipping module is UPS, it will apply to all products in the shop, but if some products have special shipping rates you can assign them on Edit Product > 'Stock & Shipping' tab.
Please take a note that if shopping cart contains items from different shipping modules (for example, from USA and Europe warehouses) then customers will be offered to select a shipping method for each product.
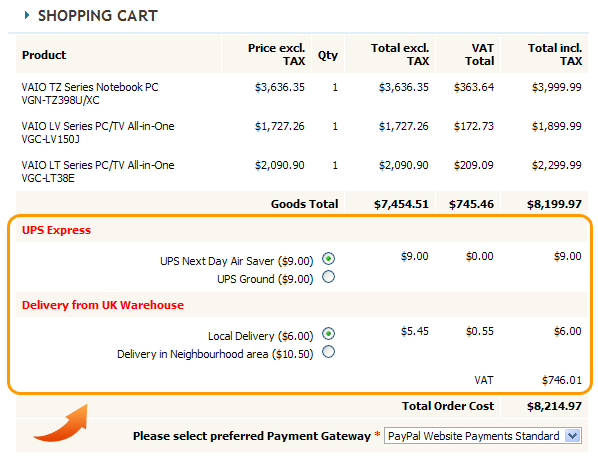
In Settings > Orders > Shipping Methods > Edit Shipping Module > User Module Name you can specify a name for a shipping module that will display above methods selection.
Mobile Version
Mobile Version represents a new set of templates suitable for mobile devices such as iphones, cells, tablets etc. Mobile version in ViArt Shop is based on the same principle as multi-sites module where you can add a new site, select individual settings, layout and items per each site.
Settings: to activate mobile version you need to do the following steps:
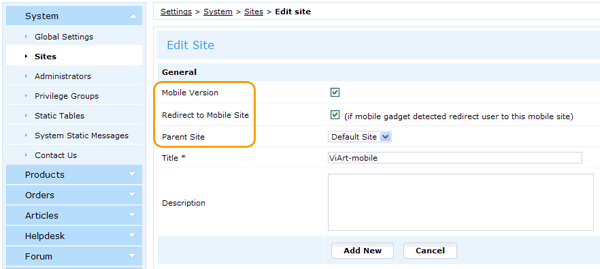
- Go to Settings > System > Sites and click Add New. In the appeared window tick off Mobile Version and Redirect to Mobile Site checkboxes and select Parent Site. Please note, 'Mobile Version' setting automatically assigns mobile design and mobile templates to your new site.
- Work on the new site settings. The most important ones are:
Global Settings - indicate your mobile version domain. Just like with multi-sites you can use either a new domain and ask your administrator to make appropriate changes with virtual hosts or use a subfolder within current site (read more). A mobile version domain will require additional license activation which you can obtain here (it is half of the original license cost).
Settings for Pages Layouts - by default when you create a new site it doesn't have any blocks on any pages so you need to copy them from the main site using 'Settings' link on Settings > System > Sites.
Products - this setting is optional as by default all products from the main site will be available on the new site as well.
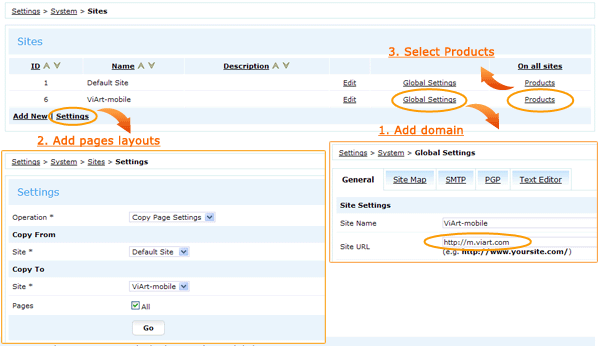
The rest of the settings, for example, articles, custom pages, Site Navigation etc. are available in corresponding sections of the admin where there is now visible a new tab "Sites".
'Re-Order' button
On User Home > My Orders page was added a new column 'Re-Order' with cart icon that suggests to repeat the order (buy the same items again). Cart button is also added on View Details page.

Settings: Go to CMS > Pages Layouts > My Orders: List click on the settings of block 'User Account > My Orders: List' and check/uncheck Show Re-Order button option. The same option is available for 'My Orders: View Details' block.
Note, if product is no longer on sale or changed price user will be notified about this when he uses 'Re-Order' button.
CKEditor and WYSIWYG
What's new: First of all, now editor settings have been moved to a separate tab in Settings > System > Global Settings.
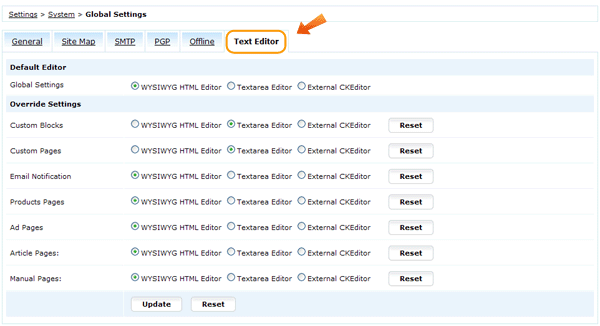
You can select a global setting or redefine editor selection for some admin pages such as Custom Blocks, Custom Pages, Email Notification etc.
Second of all, was added a possibility to use CKEditor in ViArt Shop.
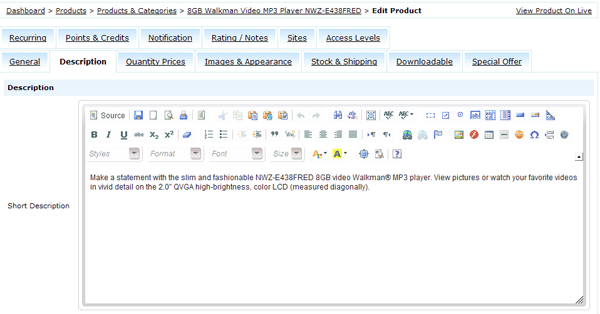
Settings:
- Select 'External CKEditor' option in Settings > System > Global Settings > Text Editor.
- Download CKEditor software from http://ckeditor.com/download (it is free of charge);
- Extract "ckeditor" folder in the root of your ViArt Shop installation.
'Order Approver' Privileges
A new functionality to assign an 'order-approver' administrator to a User Type has been added in ViArt Shop. An order-approver receives an email whenever a user from assigned User Type orders a product and order-approver has privileges to approve or manage these orders.

Settings:
- Go to Settings > System > Privilege Groups and create a new Privilege Group, select permissions for it and then go to 'User Types' tab. By default there is selected an option 'Access to any users data' but you can uncheck this box and select allowed User Types manually.
- Go to Settings > Orders > Orders Statuses select a status you use for paid orders, for example 'Validated', click Edit Status > 'Administrator notification' tab, activate 'Send notification to Administrator(s) if status applied' and then Select Privilege Group for email notification.
- In 'Access Levels' tab of order status you can select what administrators are allowed to do:
- be able to see orders with this status
- set this status for any orders
- update information only in orders with this status


This way you can create admin groups that will never see each others orders - once administrator logins he could see and work only with his special status.
Export Templates by Cron
In addition to already available Export Templates functionality (ability to save export fields selection and apply it for next export) we added Cron Job and FTP settings. Now Export Templates could be used as a powerful report system to notify managers about events in the shop, to dispatch order items to warehouse or as a helping tool to integrate with third party accounting/management systems.
Settings: create an orders (or products) export template and set it to export by cron:
- Go to Dashboard > Orders > Sales / Orders and click 'Export All Orders' at the bottom of the page.
- Select the fields you would like to export such as Order No, Order Total, Product Name etc.
- Find a textbox Save as new export template and click Add.
- Go to Settings > System > Static Tables > Export Templates and click Edit.
- In Cron Job tab select Generate by Cron checkbox and in the File Path Mask specify the name of the export file (you may use date tags: {YYYY}, {MM}, {DD}, {HH}) or a usual name) and the full path where it should be saved.
Note: File Path folder should be on the same server as your shop and have writable permissions. If you wish to export templates to the outside server please use FTP tab and enter the FTP login data there.
And with the help of Update Order Status option you can assign a new status to order once it was exported (e.g. Dispatched, Captured etc.).
- In Filters tab select what orders should be exported, filtering them by Order No, Name, E-mail, From Date, Order Status etc.

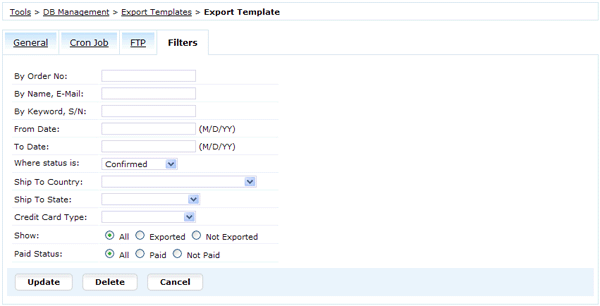
Note: the filter settings would be different if you select Database Table * 'Products' in General tab.
The Cron Job settings in ViArt Shop admin allow to run cron and execute the script admin/admin_export_cron.php but the actual cron should be set up via your hosting cpanel or by a root command line, for example like below:
0 6 * * * /path/to/php -f /home/viart/public_html/admin/admin_export_cron.php -l mylogin -p mypasswordEmail Campaigns
Newsletters in ViArt have undergone significant changes and now called Email Campaigns. The main feature of new module is the ability to create a series of timed email campaigns targeted to a specific group of customers. You can create all your emails in advance, combine them in groups (campaigns) and simply activate the campaign - system will send out each unique email on its timed sequence. Another fundamental change is ability to run reports on a campaign. Doing so will allow you to know out of the targeted set of emails, who purchased, when and who didn't purchase.

Settings: Email Campaigns module is activated in Dashboard > Email Campaigns. Please read detailed information about EC module in our new manual.
Social Media blocks
In CMS Blocks was added a new section Social Media with two blocks so far: Facebook Feed and Twitter Feed.

Both of these blocks pick up latest news feed from your Facebook or Twitter accounts and show this information in the special block on your site.
To activate Twitter Feed you need to connect it to your account. Go to CMS > Pages Layouts > Home Page Layout add "Social Media > Twitter Feed" block to one of the frames and click on its settings (tools icon) where specify your Twitter Username and Records per Page you wish to display.
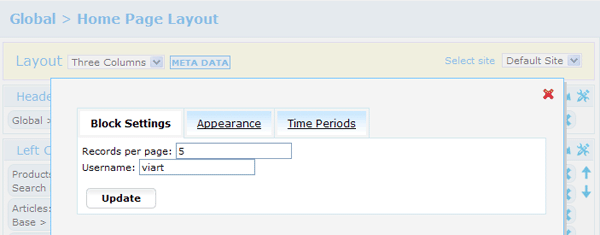
Activating Facebook Feed is a little more complicated because you need to create a Facebook App and get an access token for it. Please read the full setup process here.
Time Periods in blocks
Time Periods is a new tab in CMS Pages Layouts block settings. It works as a dynamic block display based on date and time which allows to run different promotions on the site or to show valid information when it applies.
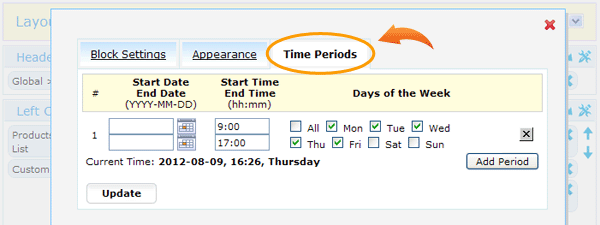
For example, you can set up a block informing about working hours of the shop: "Our shop is open. Please feel free to call and place an order." and select for it appropriate time period e.g. Mon-Fri 9:00-17:00 which means this block will show up exactly during these hours and these days of the week.
Another example, you can run site-wide sales discounts during weekends or some holidays with the help of coupons functionality (coupons have Start and Expiration Date as well) and inform customers about this promotion with a colorful banner set to show within sales period.
Note, if block doesn't have any time periods it is always shown otherwise if you specify at least one period it activates logic for time periods.
Sales Discount coupon
In addition to already available coupons (Order Coupon, Product Coupon and Gift Voucher) was added a new type called Sales Discount. This coupon is unusual for two reasons:
- it applies without adding products to cart
- it crosses out regular product prices
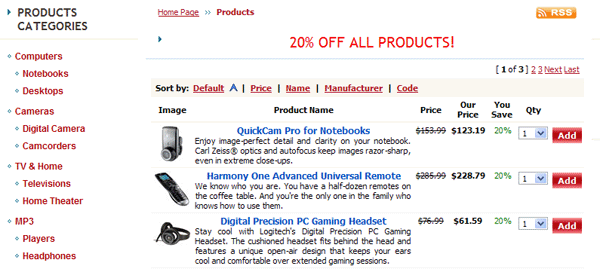
Settings: go to Dashboard > Products > Coupons and click Add Sales Discount.

Next specify Coupon Title, Discount Amount and in "Products" Tab select to what products it should apply (all products, individual products, product type or product category). In "Coupon Restrictions" Tab you can set up Minimum/ Maximum price of product and the period when sales coupon is valid. Also you can select individual users or user types in "Users" Tab.
Categories List on Ajax
Block Categories List has a new drop down display where categories expand with the help "+" button and retract if clicking on the "-" button. Ajax technology allows customers to drill down into your categories list without having to load all categories on each click.
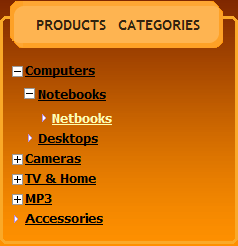
Settings: go to CMS > Pages Layouts > Products Listing Page click on the settings of block "Products > Categories List" and select for Categories type view: Ajax tree type. Click Update and Save the changes.
Address Book
A new Address Book section was added to User Home in ViArt Shop. Now your customers can manage multiple personal and delivery addresses and select one of them during checkout as opposed to having to manually type in each address each ordering time.
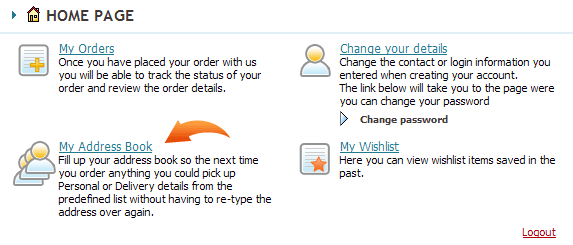
Settings: to activate new feature go to Settings > Site Users > User Types > Edit Type and check My Address Book option.

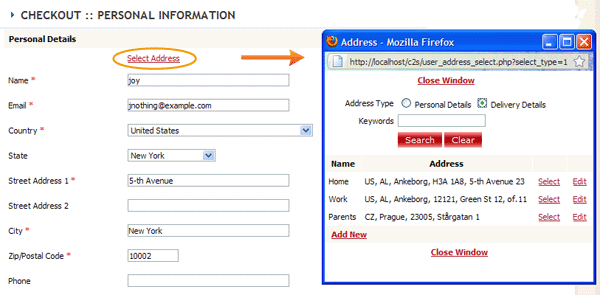
States List per Country
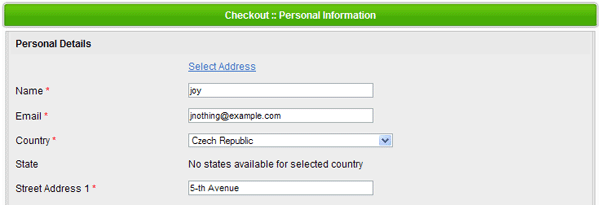
Now you can add new states in Settings > System > Static Tables > States and select a country for each state.

The States drop-down list on checkout and during registration will contain only the states for selected country and if country doesn't have any states then the field will become unrequired and show appropriate message.
Call Center mode
As you know from v.4.0.7 ViArt Shop's Call Center module has moved to the front end. It means whenever you are logged in as administrator you are in the Call Center mode and see specific settings. Now along with Products link on basket.php was added an ability to choose options. It is very useful when you have products with required options.
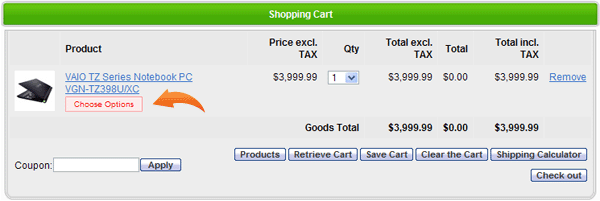
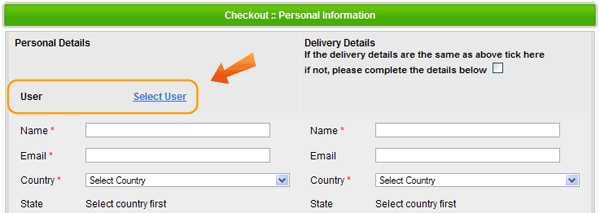
Also finally was added a link to select Users on order_info.php page
Cookies Control
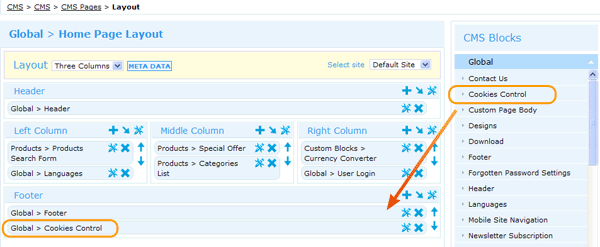
Due to recent Cookies law enforcement some EU countries are required to ask visitors for their consent before they can install most of the cookies. If you are from a country that must comply please go to CMS > Pages Layouts > Home Page Layout and add a new block Global > Cookies Control.
It will show a small cookie image in the left corner of the page where user can disable cookies and click on a custom page link to read more information about cookies used by ViArt.
![]()
Saved Cart notification
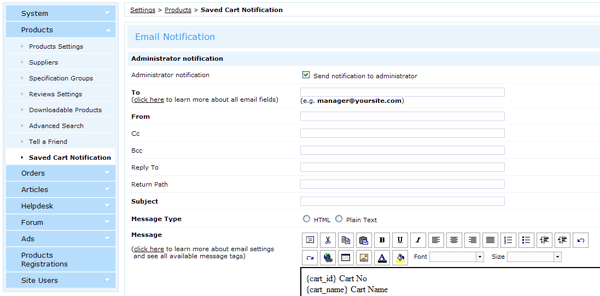
Our old functionality Save Cart and Retrieve Cart from basket page now has a new option to send a notification with {cart_id} and {cart_name} information. To activate Saved Cart Notification please go to Settings > Products > Saved Cart Notification.
Other improvements
Site links
- removed category_id tags from friendly URLs
- disabled automatic generation of language links in Site Map (e.g. http://wwww.yoursite.com/index.php?language_code=it)
CMS improvements
- added special breadcrumbs for Pages Layouts
- blocks are sorted by alphabet (in all languages)
- added a scroll bar for long list of blocks
Security measures
- added 3-second delay before next attempt to login
- credit card information is forbidden to send in an email
- patched admin scripts for possible XSS attempts
Speed Optimization
- Site Map now works on Ajax technology
- Advanced Search queries are rewritten to search by options much faster
- Manufacturers block is rewritten with better logic
Editor
- added WYSIWYG and CKEditor in all email notification forms
- ViArt's WYSIWYG is now supported in Opera, Google Chrome and Safari
- added a possibility in WYSIWYG to edit image settings in a pop-up window
Payment systems
- PayPal logic is rewritten to send order items on separate lines instead of all in one line
- Google Checkout is rewritten to work on PHP in CGI mode
- PayFlow Pro Express is updated
- added a new tab to select Product Types
- added a new tab to select Countries
- added a new setting "Use this payment system for unregistered users"
Google Merchant Center
- added a report page to show product IDs conflicting with Google Merchant Center requirements
- changed Google Product Type hierarchy - now Google Merchant Center is activated in Product Types
var_definition.php additions
- Keywords Search has a new condition you can activate in var_definition.php:
$va_keyword_like = 1;
//activates search by partial terms (part of the word) - You can increase/decrease currency rates received from floatrates.com with the line:
$va_rate_multiplier = 1.05;
// this example will add additional 5% for each rate
Other changes
- updated Google Analytics logic to work with asynchronous syntax
- Full Site Search shows results in different blocks (products in Products Listing, articles in Articles Listing etc.)
- Added 14 new languages
ViArt Team.